


Homemade Crafts for Kids
Fun, easy crafts and activities for kids of all ages using everyday items like beads, paint, bubbles and more


Beads
2-5 years: Stick with edible options like O-shaped cereal threaded onto string. Or anchor pieces of spaghetti pasta upright in the holes of an upside-down sieve or colander. Then show your child how to stack the cereal onto the pasta.
5-8 years: Move up to stringing beads onto pony lacing (amazon.com), a rubberlike string that's easy to fasten.
8-12 years: Offer your child more grown-up glass beads; she can use an embellishing glue (from crafts stores) to adhere them to card stock to create bedroom wall art.

Stamps
2-5 years: Make a stamp pad by dampening a sponge with paint and placing it on a plate. Then give your child textured objects—such as blocks, pinecones, foam shapes—to press into the sponge and stamp onto paper. Even more fun: Make giant foam stamps your kids can use to decorate a bedroom or playroom wall!
5-8 years: Have your child use a rubber stamp to imprint each letter of the alphabet on a set of smooth stones or unpainted building blocks. Now he can practice his spelling words by “building” them, or use the blocks as “place cards” at the family table.
8-12 years: Older kids can use alphabet stamps to make personalized note cards, stationery, book covers and school binders with their monogram.

Bubbles
2-5 years: Blow bubbles yourself (or use a battery-operated bubble maker) and have little guys race to pop them. Older sibs can keep score on a chalkboard.
5-8 years: Add half a cup of washable tempera paint (from a crafts or toy store) to one cup of the bubble solution in a shallow pan. Using a straw with the end held about an inch above the surface of the solution, have your child blow gently into it until you have a bowlful of bubbles. Place a piece of paper gently over the bubbles. As they pop, they'll leave their print on the paper.
8-12 years: As the younger ones go bubble wild, older sibs can capture the antics on camera as the bubbles float, land and pop. Then they can use the images in a collage or arrange them in a frame that holds multiple pictures.
Playing Cards
2-5 years: Have an extra deck on hand to keep the small set busy while the rest of the family is playing a game of Go Fish or Concentration. Give your child a box with a slit cut in the top and have her “mail” each card through the slit. Then empty the box and have her sort the hearts, spades, etc.
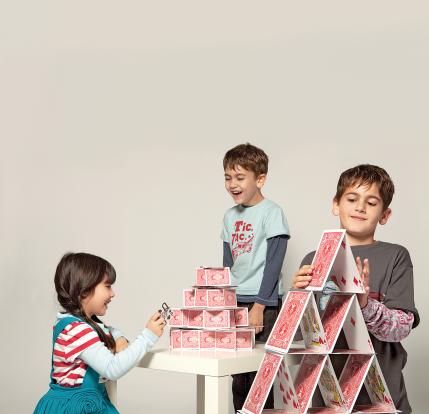
5-8 years: Build a house of cards. Have your child stand a card on its side, then carefully position another at the card's center so the two are standing perpendicular to each other. Balance another card at the center of one of the existing cards. Keep adding on until you have a big enough base. Then gently lay cards on top to make a roof. Repeat to build more levels.
8-12 years: Try a trickier version: Using a deck of giant playing cards (at toy or magic stores), have your child take two cards and position them vertically about two inches apart. Then lean them in toward each other to form an upside-down “V.” Position another upside-down “V” directly next to them, and so on. Lay cards facedown for the roof, then add more stories to your structure.

Scissors
2-5 years: Cut construction paper into long, thin strips. Tape one end of each strip to the side of your little guy's tray or pan. Now show him how he can cut the strip with a single snip of his child-safe scissors, letting the clippings fall into the tray. From there, have him try clipping pictures of animals or, say, anything the color red from the pages of a magazine.
5-8 years: This age group will have fun making paper chains. Try a heart chain or paper dolls; you can find instructions for these and more paper crafts here. Or create snowflakes by folding a square piece of paper (it has to be square) in half three times and then cutting in shapes on the folds and edges.
8-12 years: Older kids can play designer by cutting out photos of cool beds, lamps, desks and so on, then gluing them on a piece of construction paper to create their dream house or bedroom. Or give them a few catalogs to cut out and glue their favorite items on paper to make a birthday wish list.

Paint
2-5 years: Use an eyedropper to drip color onto damp paper or coffee filters. Watch the colors blossom into cool shapes as the paint travels across the wet paper. Try other tools, like a small paint roller or a toothbrush, and when paper becomes boring, switch to boxes.
5-8 years: Your child can paint flowers or leaves, then flip the paper over and press it onto a clean sheet, creating an imprint. Or tape stencils down all over a large piece of paper. Let your child paint in the gaps, then remove the stencils and see the fun shapes he's created.
8-12 years: Have your child first sketch a design on a piece of paper with colored pencils, crayons or oil pastels. Then she can paint over the drawing with diluted paint or watercolors to create a layered picture.

Welcome guests to your home or backyard with this adorable bird sign made of bright colors and shapes.
1.Paint a 6 1/2-inch plywood circle, a 2 1/2-inch plywood circle, and a 3-inch-long plywood heart with two coats of acrylic paint.
2. Using wood glue, attach the small circle off center to the large circle. Let dry.
3. Glue button on for the eye. Let dry.
4. Glue the heart to the back of the large circle, allowing only the tip of the heart to show. (This is the bird's beak.) Let dry.
5. Glue one end of a wooden stake to the back of the bird. Let dry.
6. Place in your garden.

Inspired by Tibetan prayer flags, these playful garlands will spread good cheer and happy thoughts to your garden.
1. With scissors, cut six 8 by 8-inch squares of duck canvas.
2. Use acrylic paint to make fun natural shapes, like the sun, flowers, birds, trees, and the earth, on the fabric.
3. Wrap 1/2 inch of the top of the canvas flag around a piece of thick twine and adhere with outdoor glue, which can withstand the elements (we used Gorilla Glue). Then use binder clips (found at office-supply stores) to hold flag in place while the glue dries. Note: Start the flags at least 2 1/2 feet from one end of the twine so you have enough of it to wrap around a tree or a fence.
4. Do this for each flag, leaving 6 inches between flags and 2 1/2 feet of twine at the other end of the bunting.
5. Find two trees or posts and hang.

Your preschooler will love making this supersweet caterpillar to decorate a houseplant.
1. Stick a skewer in 1 1/2-inch Styrofoam balls and paint each ball a solid color using acrylic paint.
2. Place the skewers in a tall cup and let paint dry.
3. Once dry, hot-glue three of the Styrofoam balls together. Hold in place for 30 seconds until dry.
4. Hot-glue small buttons or attach stick-on jewels as the eyes.
5. Using scissors, cut 2 inches from a pipe cleaner. Bend for antennae and insert into a Styrofoam ball.
6. Stick skewers into plant pots.


